Table of Contents
- 1. Introduction
- 2. How to differentiate your WafCharm account
- 3. Things to keep in mind when using AWS WAF Classic
- 4. How to set up WafCharm with AWS WAF Classic
- 5. Using WafCharm with CSC Managed Rules
1. Introduction
WafCharm has stopped accepting new account registration with AWS WAF Classic starting June 1st, 2023 with the new update. The blog posts have also been updated to reflect the new specifications.
However, you can continue to use WafCharm with AWS WAF Classic if you have created a WafCharm account before May 31st, 2023.
This post will contain information about configuration and specifications for those who would like to continue using AWS WAF Classic.
2. How to differentiate your WafCharm account
The WafCharm dashboard's look and feel will not change regardless of when your account was created.
If you are unsure of which specification your account is applicable for, you can use the methods below to check.
1. Check if you can see the [Web Monitoring Config] button under the [AWS] at the upper menu in your WafCharm dashboard
Web Monitoring Config is a new configuration page that is provided starting June 1st for you to enable the web monitoring feature. If your account has been created before May 31st, this page will not be available.
2. Check the [Web ACL Version] options under the [Add Web ACL Config] page
As stated above, AWS WAF Classic will not be available for WafCharm accounts created after June 1st. If the [AWS WAF Classic] option is available under the [Web ACL Versions] field when creating a new Web ACL Config, your account was created before May 31st. If not, your account was created after June 1st.
3. Things to keep in mind when using AWS WAF Classic
You can only create up to 10 rules in your web ACL in AWS WAF Classic. WafCharm will also follow the specification of up to 10 rules.
In addition, the rule customizations we can provide will be as follows:
- Customizations to avoid false positives
- Customizations to add new rules
Example:
a rule to counter vulnerabilities in middleware (we recommend updating to a new version without known vulnerabilities) - Other customizations based on requests
There are limitations to the number of rules and regex expressions that can be applied or registered in AWS WAF Classic. You may have to adjust the number of rules when applying customizations.
WafCharm will not be able to apply the custom rules below.
- Rate-based rules
- Rules using geographics match conditions
You are required to create these rules by yourself. When creating a rule, please refrain from using rule names that start with "wafcharm" or "wc" because it could cause WafCharm to consider your rule as part of WafCharm rules and malfunction.
Please refer to the procedure below on how to create rate-based rules.
- Create a condition to limit based on countries
- Create a condition to specify a path
- Create a rule
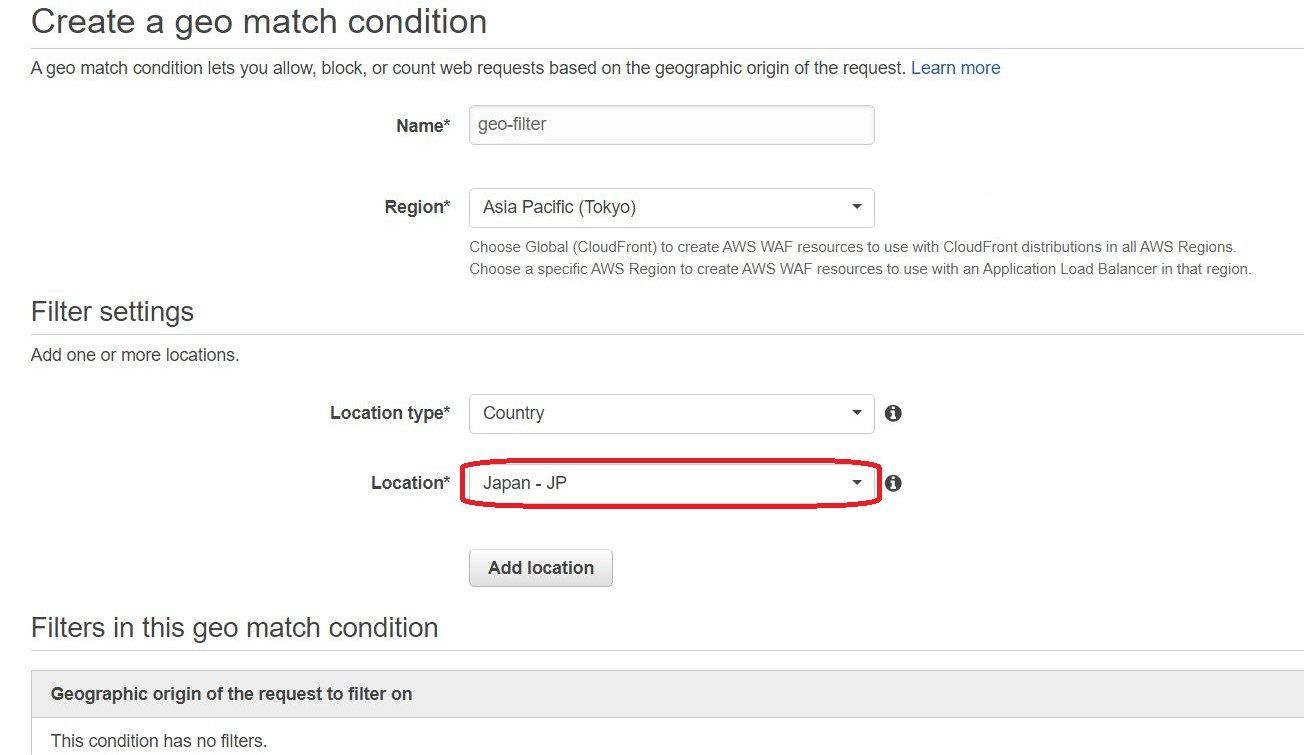
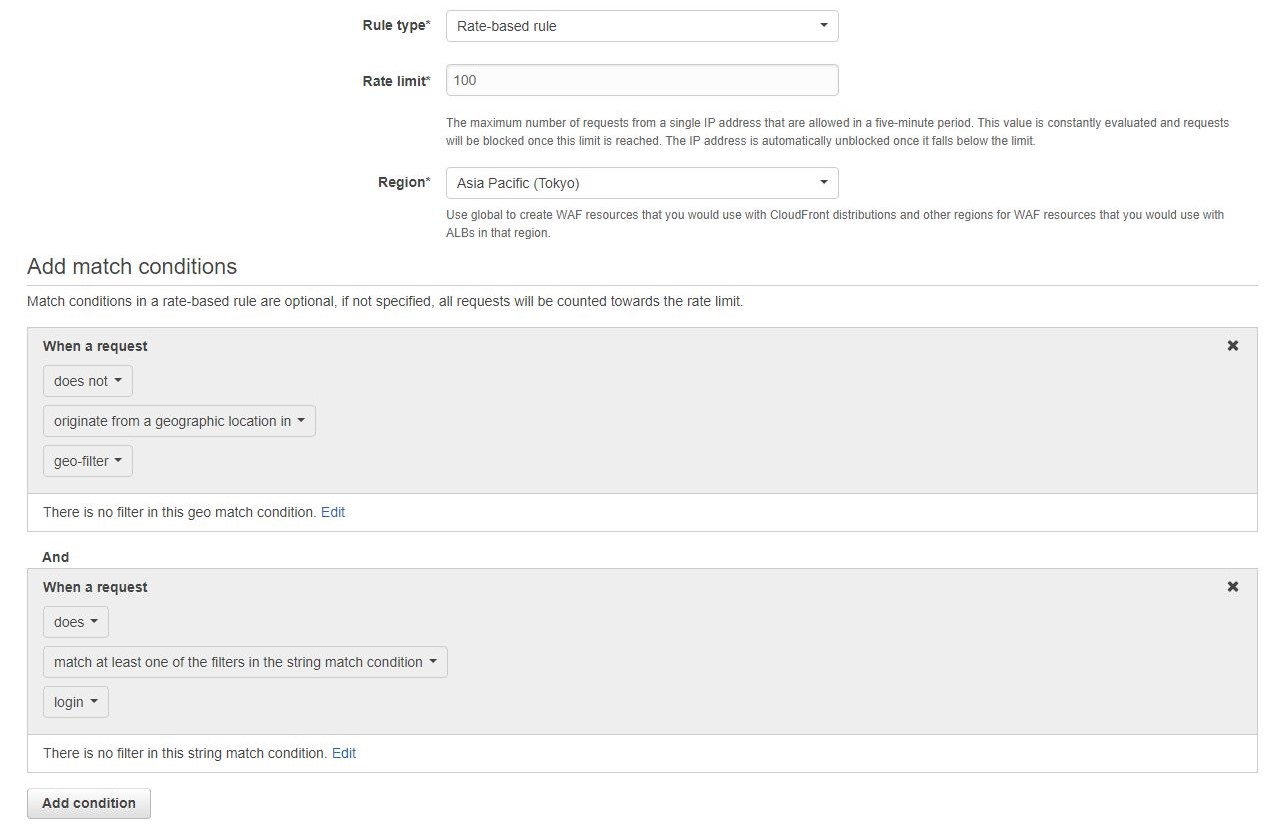
Create a condition to limit based on countries
In the condition to limit based on countries, you will need to specify the location to Japan and select “does not” for a condition when creating a rule. To set up the condition, choose “Geo match” from the menu.
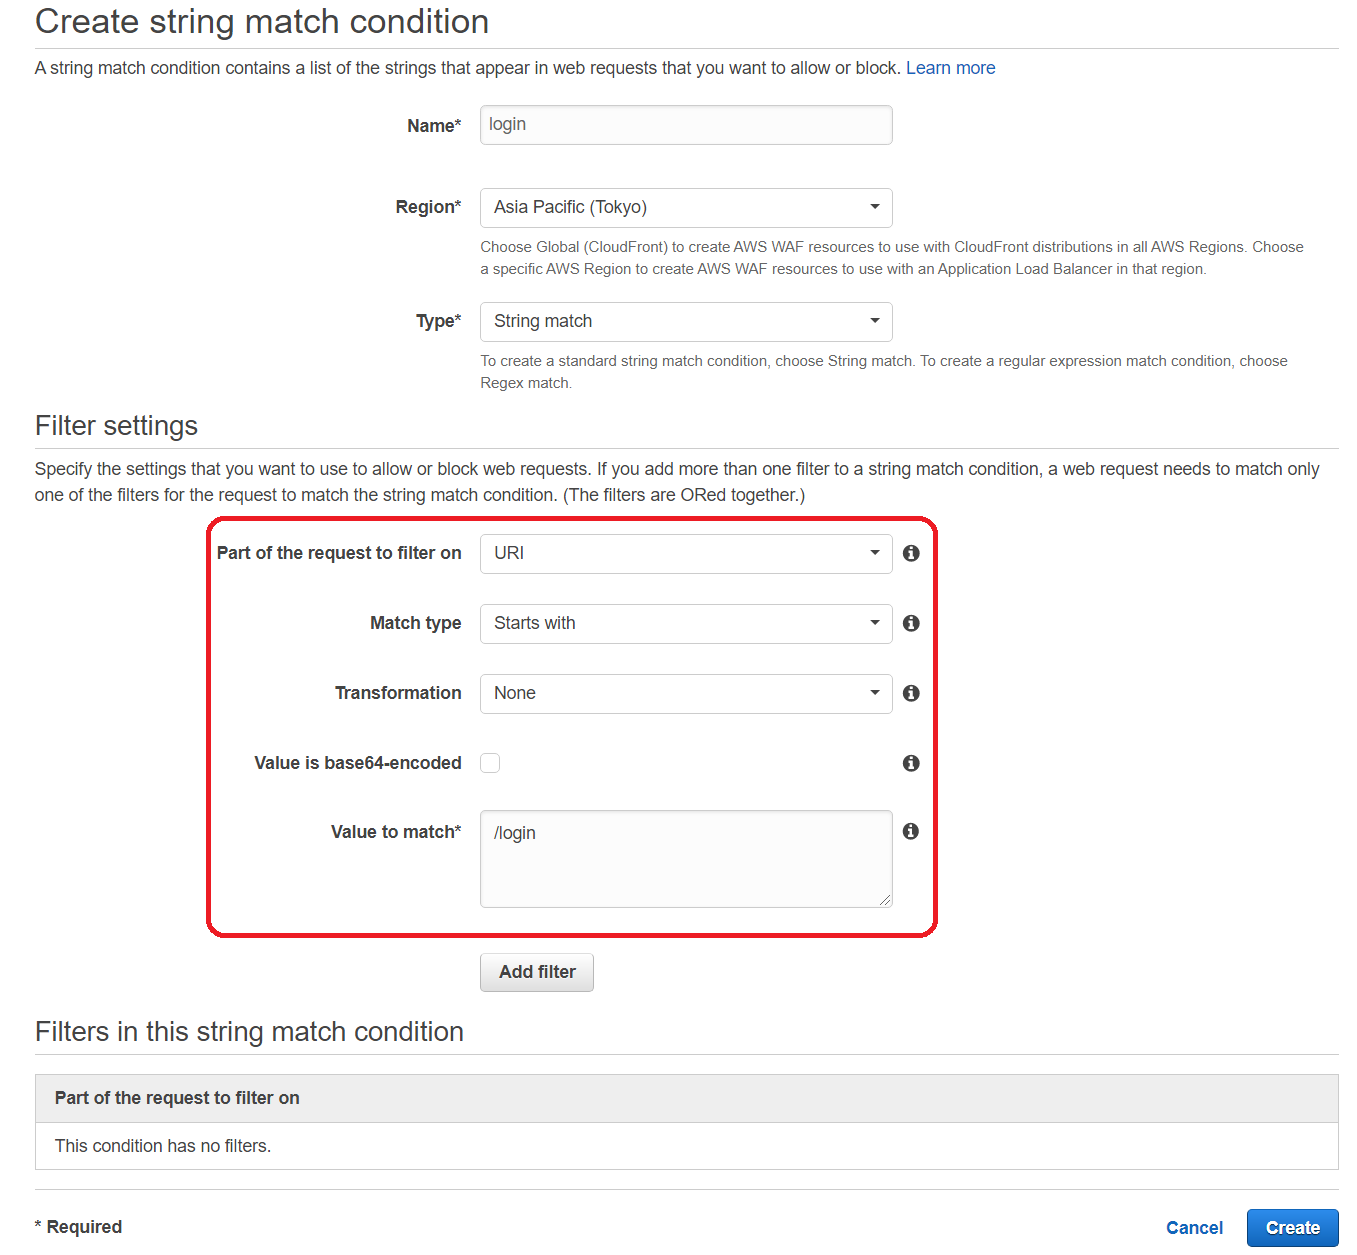
Create a condition to specify a path
Here, we will set the condition to “URI starts with /login”. Select “String and regex matching” from the menu to set the condition.
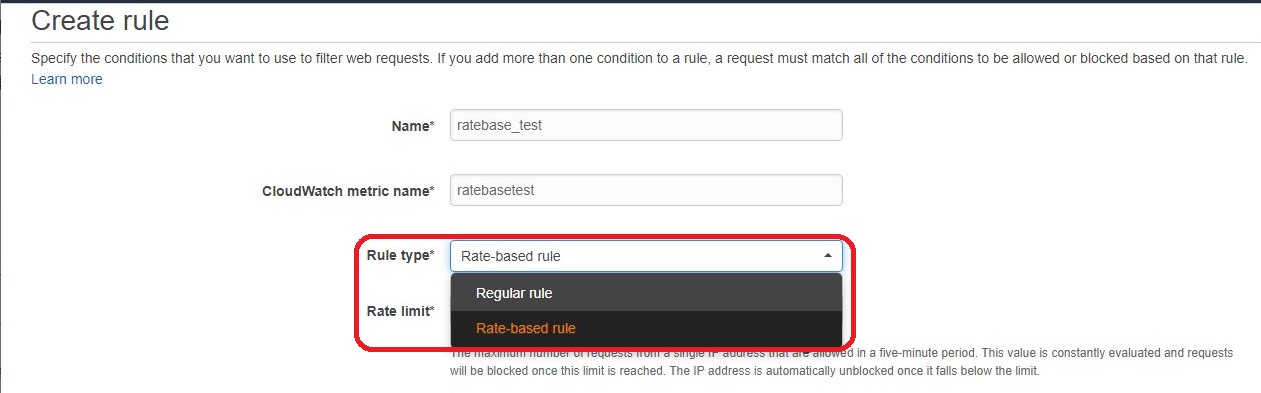
Create a rule
Click the “Rules” link from the menu to create a rate-based rule.
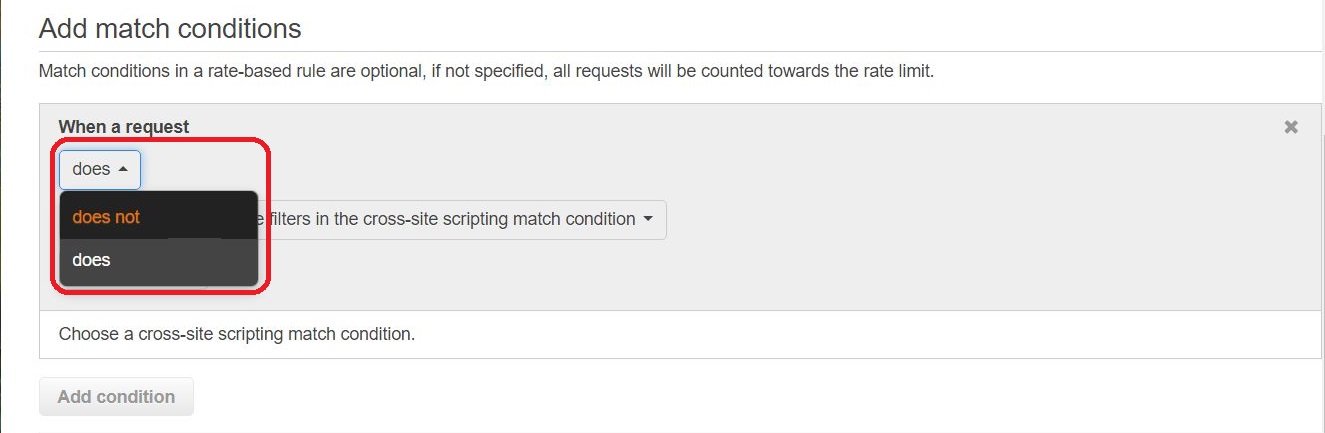
Add the conditions you created under “Add match conditions”. When you are using the “does not” option, click the pull-down menu that says “does” to change the option.
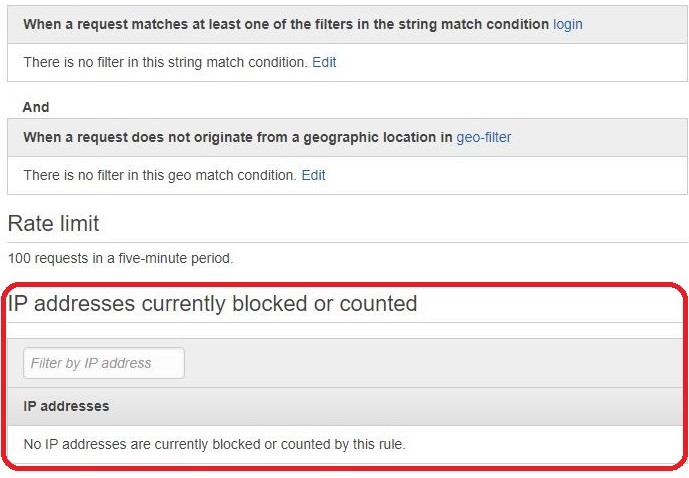
Once all of the above is complete, the rule has been set as shown below.
You can see the list of IP addresses that matched the rule.
4. How to set up WafCharm with AWS WAF Classic
When configuring WafCharm for AWS WAF Classic, you will need to complete the steps below.
- Create an IAM user or IAM role with permissions "AWSWAFFullAccess" and "AmazonS3ReadOnlyAccess"
*You can also use the existing IAM user or IAM role if they have the same permissions - Register Web ACL Config
- Register Web Site Config (if using with ALB or CloudFront)
Here are the specific items to configure in Web ACL Config and Web Site Config.
Items to configure in Web ACL Config
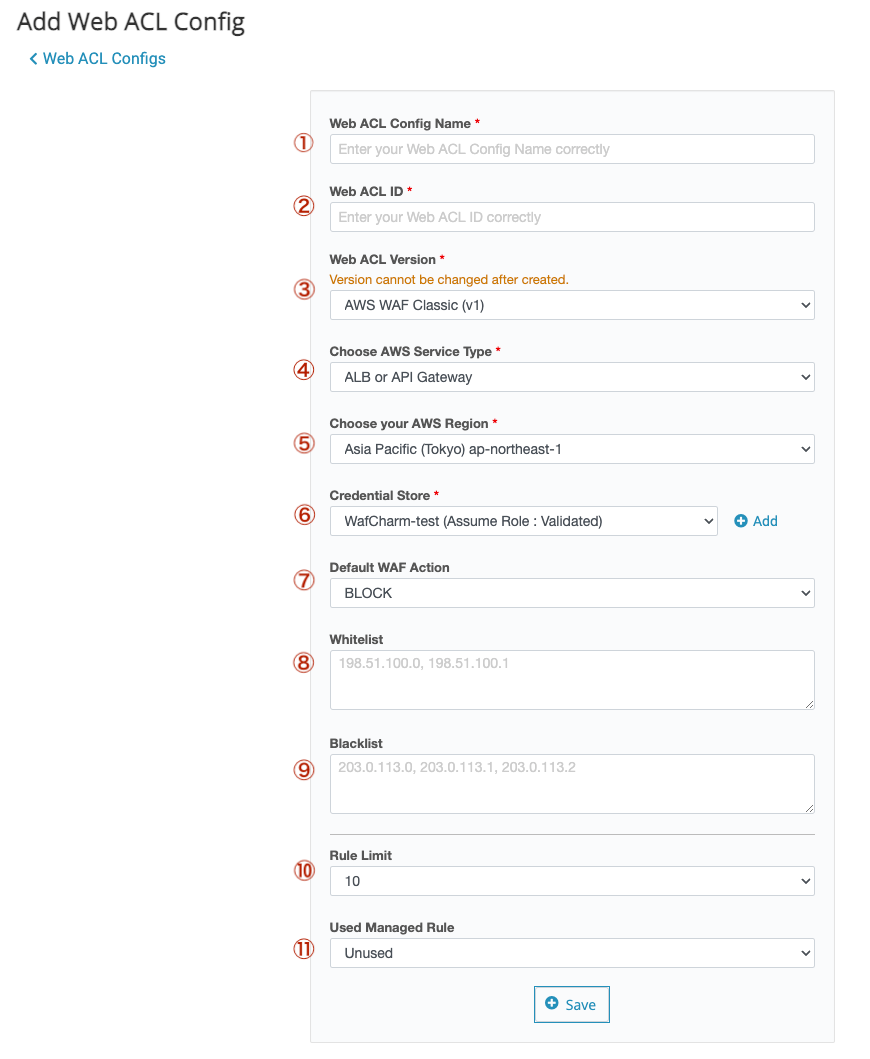
| ①Web ACL Name | Enter the Web ACL Name. It does not have to be the same as the name registered on the AWS console, but we recommend the same name. |
| ②Web ACL ID | AWS Management Console > WAF & Shield > Go to AWS WAF > Web ACLs
The ID enclosed in the red frame in the image below is the "Web ACL ID". |
| ③Web ACL version | Select the AWS WAF Classic. You cannot edit this after you create the Web ACL Config. |
| ④Choose AWS service type | Select the resource your Web ACL is attached to. *WafCharm is only compatible with ALB, CloudFront, and API Gateway. |
| ⑤Choose your AWS region | Select the Web ACL and the region where the resource is created. |
| ⑥Credential Store |
Click the Add button to register your credential information.
To use AssumeRole
To use Access Key/Secret key (not recommended) |
| ⑦Default WAF Action | You can set the action when WafCharm applies a rule to the target Web ACL. * The action of the rule that has already been applied cannot be changed with this setting. |
| ⑧Whitelist | Enter if you want to create a white list at the initial setting stage. It is also possible to make additional settings later. |
| ⑨Blacklist | Enter if you want to create a blacklist at the initial setting stage. It is also possible to make additional settings later. |
| ⑩Rule limit |
Configure how many rules WafCharm can apply to the specified web ACL. Example: Rule limit: 10 means that WafCharm and apply up to 10 rules in the specified web ACL. Rule limit: 5 means that WafCharm can apply up to 5 rules in the specified web ACL. You can apply your own rules for the other 5 rules. |
| ⑪Used Managed Rule |
You can choose to use CSC's managed rules with WafCharm. *You must sign up for CSC's managed rules separately from the AWS management console. |

Items to configure in Web Site Config
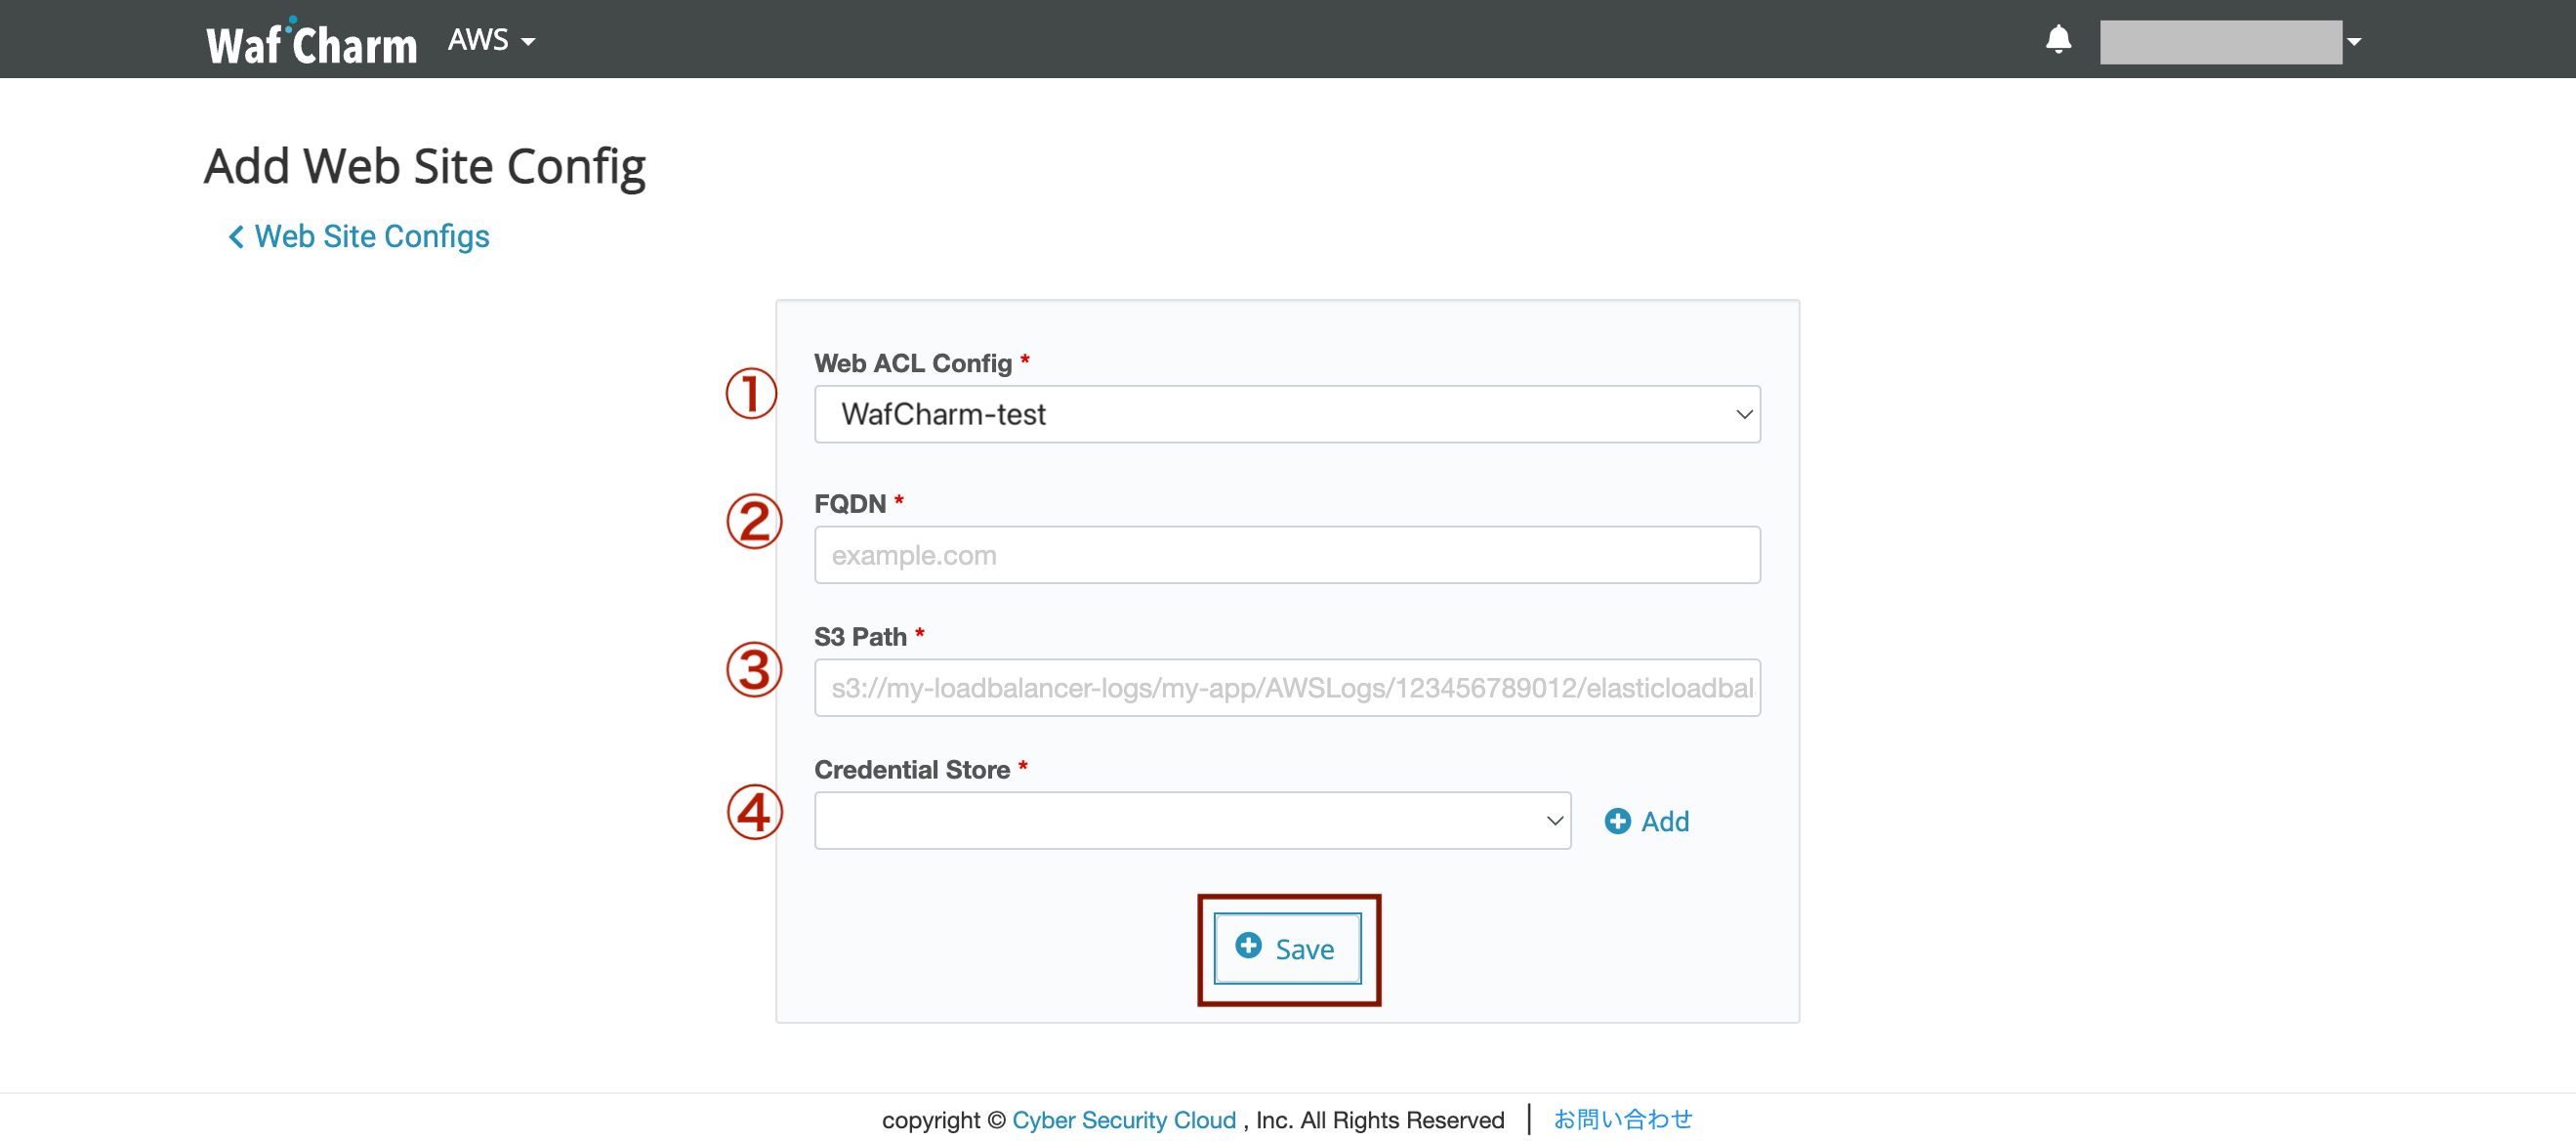
Web Site Config is a setting to register the output destination of the access log used for analysis by WafCharm. (It is not a setting to register the WAF protection target.)
* When using with API Gateway, it is not necessary to set Web Site Config.
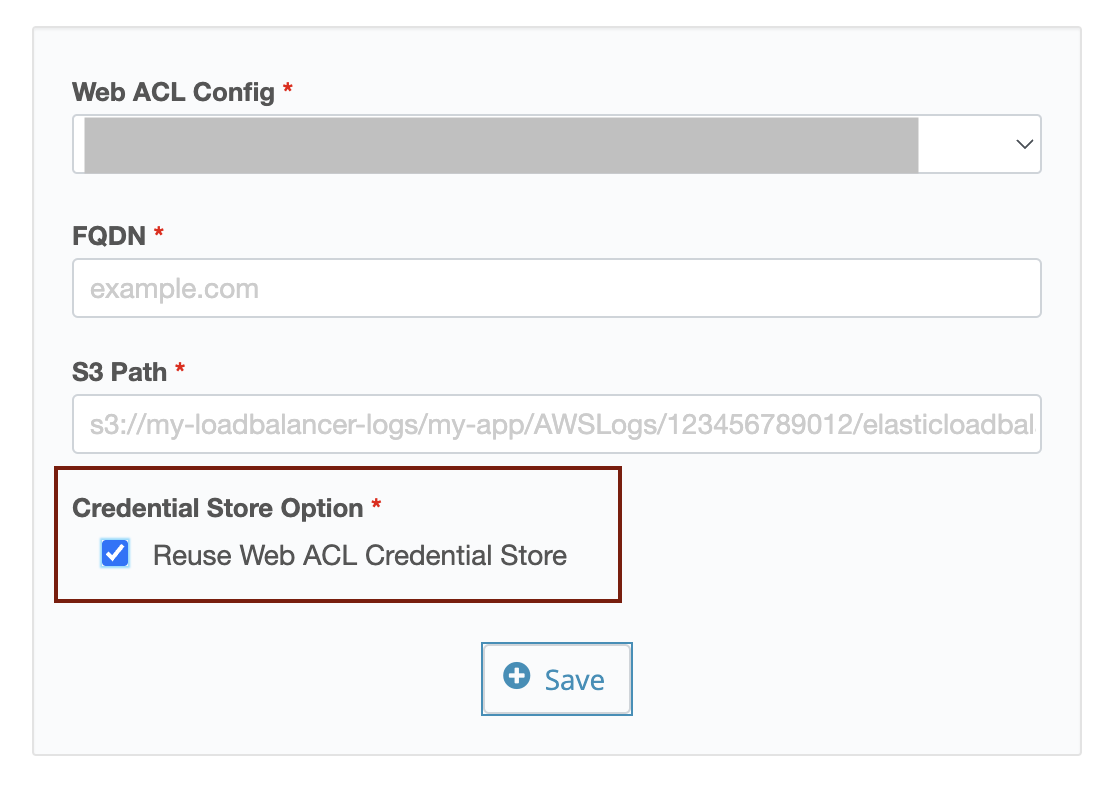
| ①Web ACL Config | Select the target Web ACL Config. * Those who have created Web ACL Config for the first time have already been selected. |
| ②FQDN |
Enter the FQDN of the target web application. * If the input contents of the following procedure (③ S3 Path) are the same, register one FQDN as a representative in Web Site Conifg even if there are multiple FQDNs. (Since WAF operates in units of resources (ALB / CloudFront etc.), there is no effect on WAF due to the difference in the registered FQDN.) |
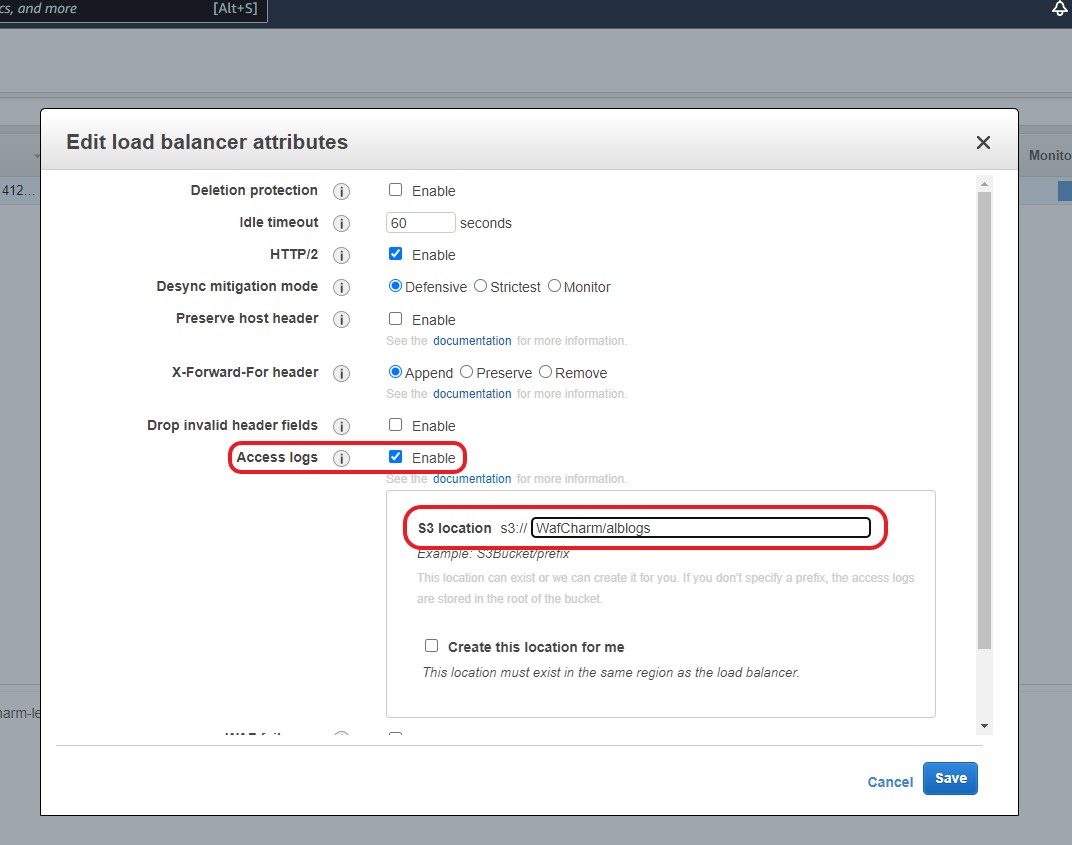
| ③S3 Path | Set the path to output the access log of your resource. Check the log output destination of CloudFront AWS Management Console > CloudFront > Check Target CloudFront and click Distribution Setting > Click Edit > Check the part surrounded by the red frame below. In the case of the red frame below, the S3 Path registered in WafCharm is "wafcharm-lecture02.s3.amazonaws.com" 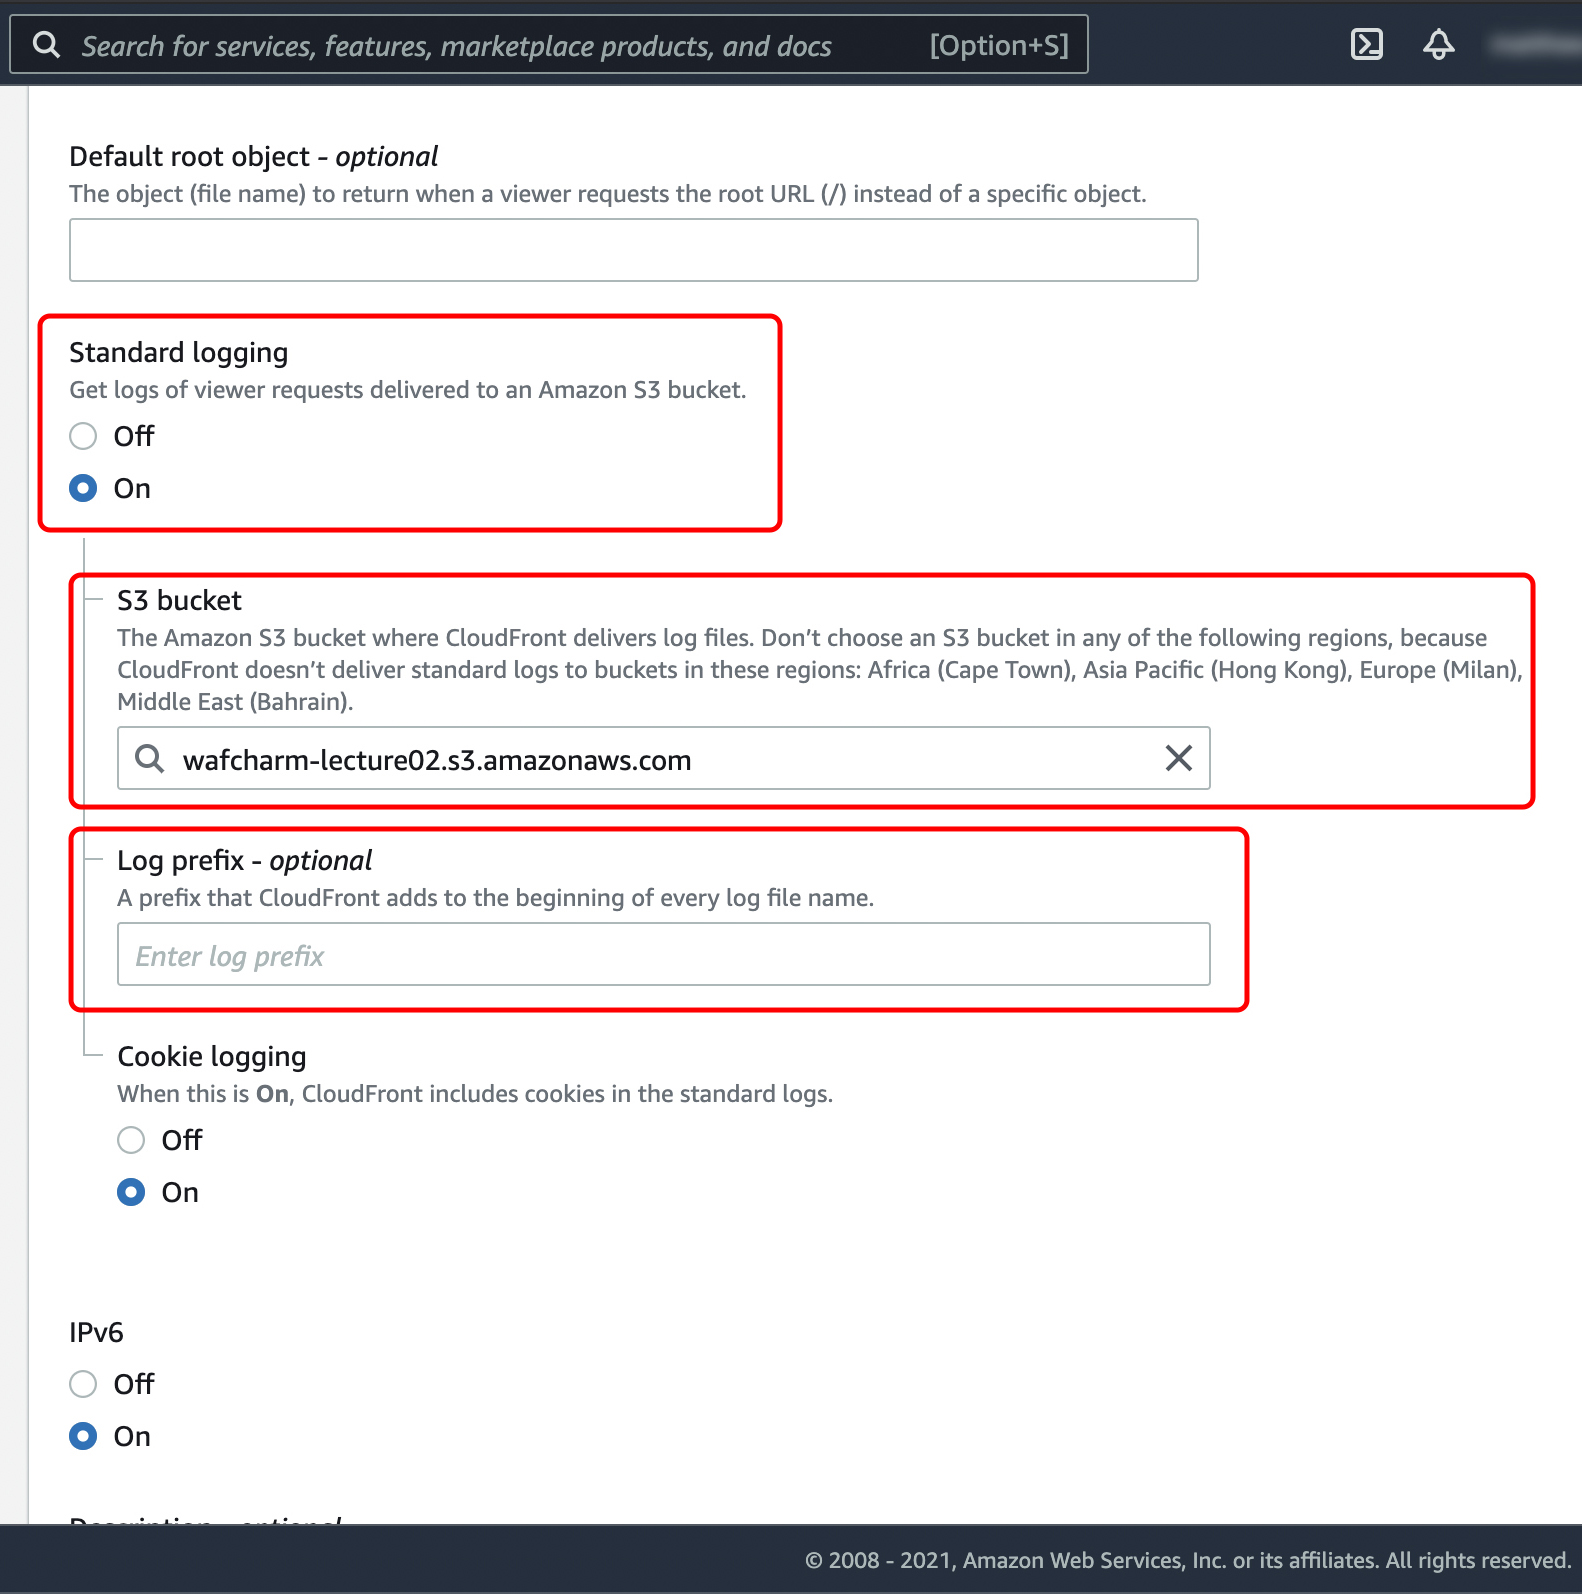 CloudFront log output destination confirmation screen * Please do not output access logs of multiple CloudFront Distributions to the relevant S3 Path. * The real-time log function of CloudFront is not supported. Confirm ALB log output destination ALB log output destination confirmation screen |
| ④Credential Store |
You need credential information of the role or IAM user that has the IAM policy "AmazonS3ReadOnlyAccess" attached.
*We do not recommend using Access key/Secret key.
To use Access key/Secret key: To use different credential information from Web ACL Config, uncheck the “Reuse Web ACL Credential Store” checkbox and select an item from the dropdown menu, or click the Add button to add new credential information.
Note |
5. Using WafCharm with CSC Managed Rules
As stated above, AWS WAF Classic has a limitation of up to 10 rules, but you can strengthen the protection by using our managed rules with WafCharm.
However, changing the rule actions of managed rules on AWS WAF Classic is very complicated. To help simplify the process, we have developed a feature to easily change the managed rules' rule actions when using them with WafCharm.
*This feature is only available to users who are subscribed to the business plan or above.
Please refer to the manual below for details of the feature.
AWS WAF Managed Rules "Rule Group Exceptions" Manual