This post was originally published in Japanese in the past.
Table of Contents
- Overview
- Previous web security measures for API Gateway
- Future web security measures for API Gateway
- Attach AWS WAF to API
- Check the API logs
Overview
On November 5th, 2018, there was a release that AWS WAF supports Amazon API Gateway.
Amazon API Gateway Adds Support for AWS WAF
In this post, we will take a look at how to deploy AWS WAF to Amazon API Gateway.
Let's go over changes before and after the release first.
Previous web security measures for API Gateway
Previously, because you couldn't attach AWS WAF to Amazon API Gateway, API Gateway was exposed to the internet.

Option for protectection 1
There was an option to place CloudFront, which could have AWS WAF attached, before Amazon API Gateway, but considering the cost and implementation, it was not the optimal option.
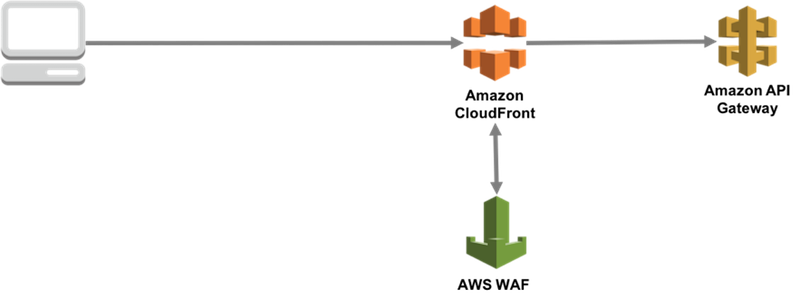
Option for protection 2
Another option is to put SaaS-based WAF in communication path, but it is not the optimal option either because it is not seamless like other AWS services in terms of availability and delay in response.

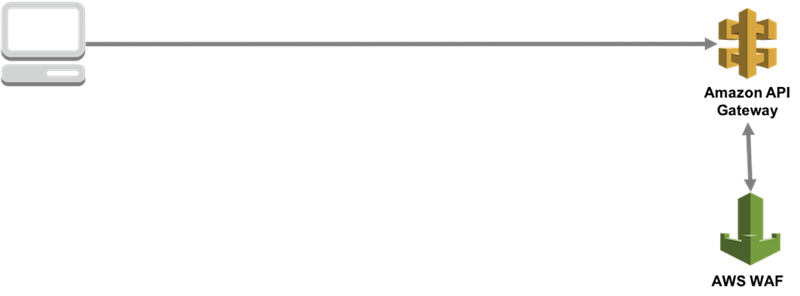
Future web security measures for API Gateway
With this update, you can attach AWS WAF to Amazon API Gateway! You can construct an environment for API in a speedy and secure manner.
Attach AWS WAF to API
1. Open API Gateway page in AWS management console.
Amazon API Gateway
2. Select the API you want to protect on the API navigation page.
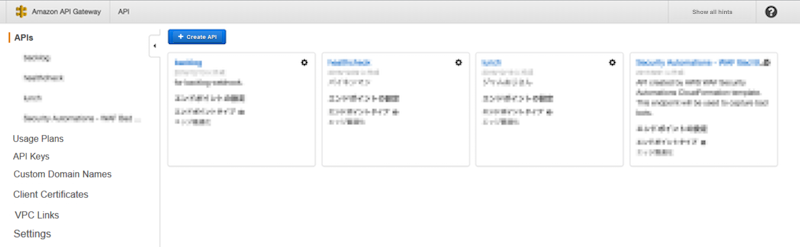
In this post, we are going to protect API that returns 200 OK to POST requests.
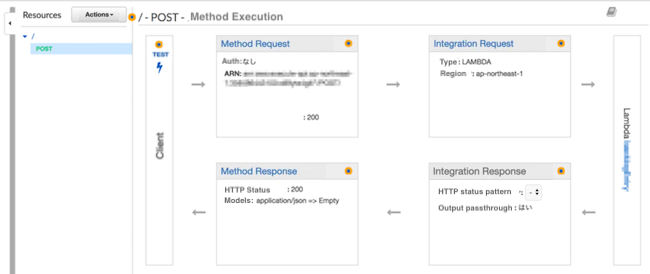
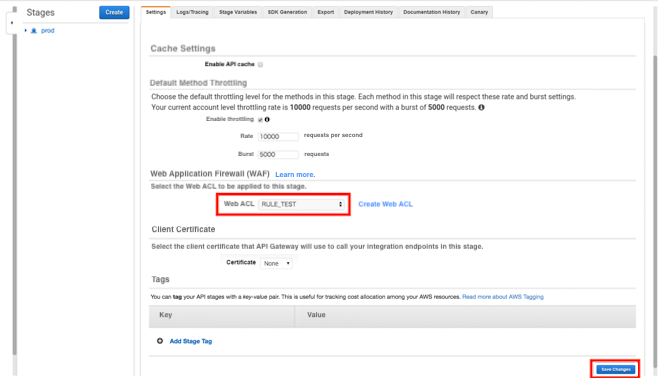
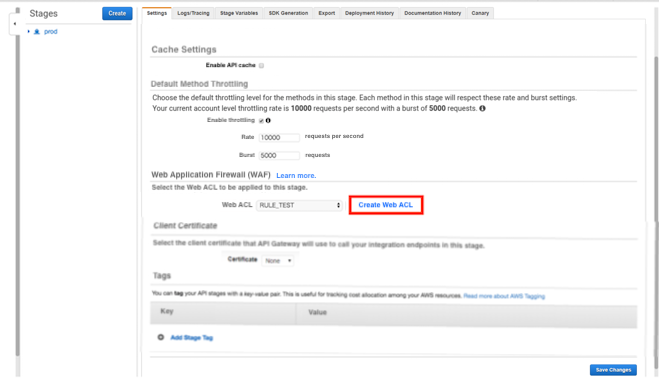
3. Open Stages of the API you want to protect and click the [Settings] tab.
You will see a Web Application Firewall (WAF) menu, so choose the Web ACL (AWS WAF) you want to apply and save the changes.
*For this post, we have created the stage with the name "prod," but the name is up to you.
Limitations
If the limitations below apply, you will need to create a new Web ACL.
Refer to the blog post below to see how to make a new Web ACL.
How to set up AWS WAF ?
Limitation 1:
The Web ACL you can choose in the setting has to be created in the same region as the ALB that uses Amazon API Gateway. If there are no Web ACLs you can choose from under the Web ACL options, you will need to create a new Web ACL.
Limitation 2:
Unfortunately you cannot choose a Web ACL created for CloudFront, so you will need to create a new Web ACL.
4. Check if the Web ACL is applied to API.
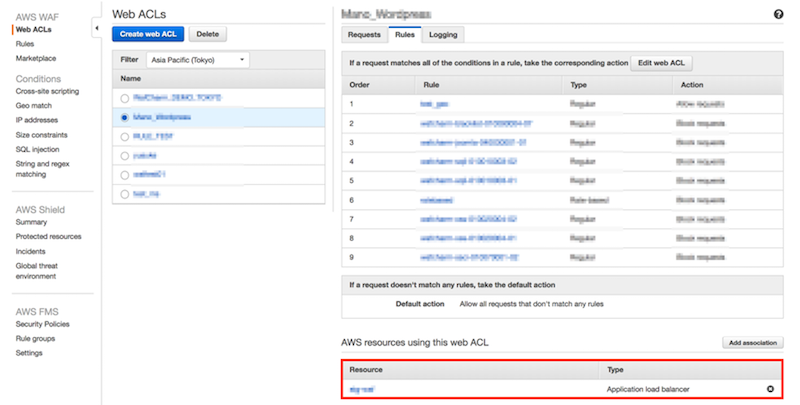
First, open AWS WAF page.
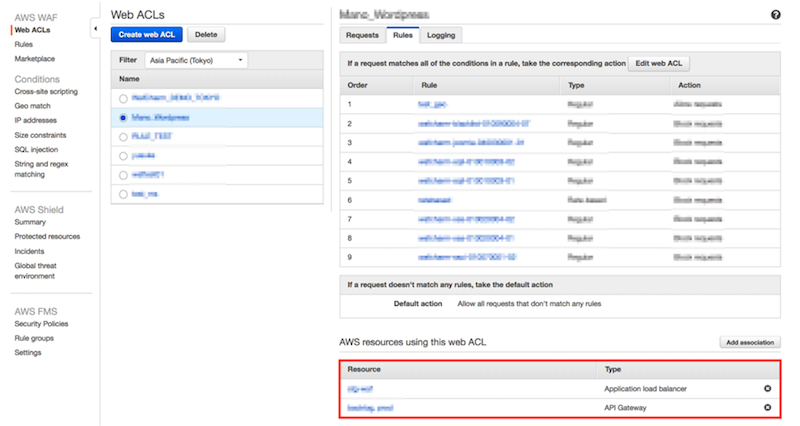
5. Open the Web ACL you've selected in Step 3 of this blog by clicking on "Web ACLs" and then click on the "Rules" tab. If you can see that your API is listed, the Web ACL has been successfully attached.
Before attaching API Gateway
As shown in the image below, the Web ACL is only attached to the ALB.
After attaching API Gateway
You can see that both ALB and API Gateway are listed (below the Type section) by attaching the API with the procedure explained in this post.
6. We will try attacking the API.
Example of a regular request
Regular request:
$ curl -X POST https://XXXXX.amazonaws.com/prod/ -vv
Result:
HTTP/1.1 200 OK
Example of a malicious request that will be detected by the rules
Malicious request:
$ curl -X POST https://XXXXX.amazonaws.com/prod/test?pw=%27%20or%201%20=%201 -vv
Result:
HTTP/1.1 403 Forbidden
If you already have Web ACL in the same region, you could attach it to API Gateway within a few minutes!
Check the API logs
We will take a look at 2 types of logs, sampled logs and full logs, to check the detected requests.
Sampled logs
You do not need pre-configure to see the sampled logs.
- From the AWS WAF navigation, click Web ACLs. Choose the Web ACL you've selected and click the "Requests" tab.
- You can see the Sampled requests section in the bottom part of the page.
Choose the rule that detected the attack we tried in the step before. Click the "Get new samples" button to see the list of detections.
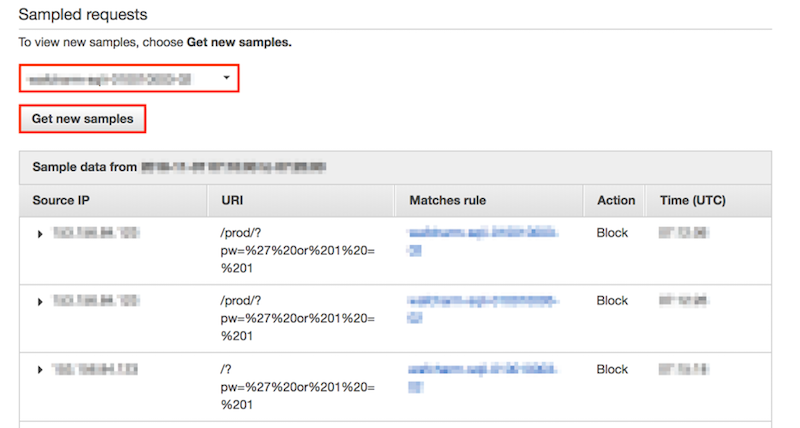
Click on the triangle (▶︎) beside the Source IP column to see the details.
Client information:
Source IP: attacker's IP address
Country: JP
Request line:
Method: POST
URI: /prod/?pw=%27%20or%201%20=%201
Request headers:
Accept: */*
CloudFront-Forwarded-Proto: https
CloudFront-Is-Desktop-Viewer: true
CloudFront-Is-Mobile-Viewer: false
CloudFront-Is-SmartTV-Viewer: false
CloudFront-Is-Tablet-Viewer: false
CloudFront-Viewer-Country: JP
User-Agent: curl/7.54.0
Via: 1.1 xxxxxxxxxxxxxxxxxxxx.cloudfront.net (CloudFront)
X-Amz-Cf-Id: xxxxxxxxxxxxxxxxxxxxxxxxxxxxxxxxxxxxxxxxx==
X-Amzn-Trace-Id: Root=x-xxxxxx-xxxxxxxxxxxxxxx
X-Forwarded-For: attacker's IP address, IP address 2
X-Forwarded-Port: 443
X-Forwarded-Proto: https
Content-Length: 0
Connection: Keep-Alive
Full logs
You will need to configure your environment to get full logs beforehand.
Refer to the blog posts below to see how to get full logs.
How to get AWS WAF Sample Logs and Full Logging
In this post, we will look at the content of the full log obtained by the procedure explained in the post above.
Information in the logs does not have a huge difference between the logs. We could also see that full logs can be utilized even when Web ACLs are attached to API.
Primary information you can see:
webaclId:"WebACL ID used for the API"
terminatingRuleId:"Rule ID of the rule that detected the test attack in this post"
httpSourceName:"APIGW"
httpRequest:{"clientIp":"Attacker's IP address"
uri:"/prod "
args:"pw=%27%20or%201%20=%201"
httpMethod:"POST"
requestId:"XXXXXXXXXXXX"}}
Even if the Web ACL is attached to both ALB and API, by configuring the Web ACL to output full log, you can obtain detection logs for API without other extra configuration.
In addition, you can distinguish between detections for ALB versus API by looking at httpSourceName (colored in red in the information above).
For API: httpSourceName:"APIGW"
For ALB: httpSourceName:"ALB"
With the update to allow attaching AWS WAF to API Gateway, we looked at a way to apply WAF and how to look at the detection logs.